
As promised, I was determined to make laminate zipper pouches two for each child! Here we go...cutting into the precious laminate! Agh!

And once I had it all laid out I realized I wanted it to be at a particular Part of the pattern. Sigh, that is the problem with using beautiful fabric right? You get picky...

So...I ended up wasting a bit (see right hand corner of the photo below) in order to make it match up for the outer sides of the pouch...

And happily this (below) was the result.
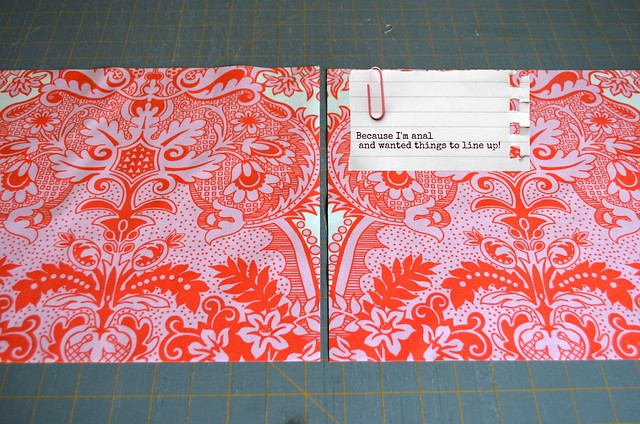 |
| Cute little note courtesy of Pic Monkey! Thanks for the tip Lucy, wink. |
Seriously, I think cutting was the hardest part. Granted, I did cut 8 pieces so I could make two pouches out of this fabric. I ended up using almost all of the fabric because of my insistence on making the outsides match up. After I sewed the pieces to the zipper, sorry no pics of that, I debated whether or not to do a topstitch for the zipper. Why the debate? Well...it is one thing to sew the underside of laminated fabric, a whole different thing to start sewing the plasticky side. As in, the fabric doesn't exactly go smoothly through the machine ya dig? Happily I remembered THIS from one of my pinterest perusals long long ago and decided to apply the same principal with the laminate top sewing.
And - IT WORKED!
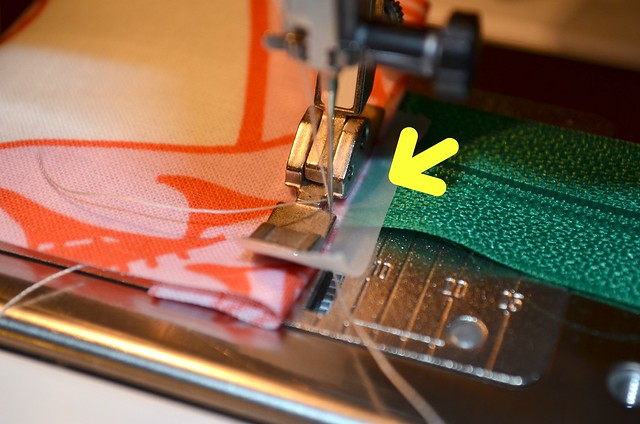 |
| tape on the underside of presser foot to allow smooth sewing on top of laminate |
I'm so glad I took that extra step because as you can see here the topstitch (right) looks so much more polished than the unsewn side (left).

Literally that was it! Final pouch below. [Scissor is purposeful, to demonstrate size.]
Can you believe this was my First Zipper Pouch? And my first time sewing Laminate? Agh! So proud of me!

Take that Green Zipper! Nailed you. This pouch will be for "clean" things. The Red Zipper pouch I am making with same fabric will be for the "dirties."

Here is the beautiful Laminate Lining - after all what would the purpose be if we couldn't clean the Inside of the pouch from potential drippy toiletries etc.?


As I said in my last post this fabric was intended for Miss E and she knew it. As soon as I pulled the fabric out to start cutting she said "that's for me" yeah, this child knows no shame. Wasn't she the clever girl when she woke up in the morning to her finished pouch and said "oh good I'm going to use that now Mommy."


Seriously the best part about this project was when I finished it and proudly interrupted the Mr.'s television watching to show the pouch off and he said "that's something the kids can take with them to college" as if they'll really get a lot of use out of them for a long time. That meant so much! It really made me feel like this idea was a fun, easy, beautiful and practical. High praise coming from the Hubby.
Red Zipper pouch is already on its way. It took no time at all to whip this pouch up once the cutting is done. So if you haven't tackled one of these pouches yet you totally should! Also, for those of you interested in learning more about sewing laminates check out Amy Butler's laminate tips here.
- rebecca lynne
11 comments:
Oh, that is so so cool! I never thought of using laminate inside and out! Great idea! Great pouches!
I LOVE Miss E's pouch! What a novel idea. Maybe you would make one for Bela too...:D
I am especially partial to the model showing it off.
yay for you! beautiful pouch and you made the pouch so perfect that noone could tell that it was your first time sewing with the zipper and laminate. Miss E is so adorable with her new pouch. :)
Your husband`s comment has made me snort with laughter - such a lovely hubby thing to say. Your pouch is just gorgeous - look at you all lined up and neat zipper too!
Oh I think I would make a balls of Laminated fabric. I'll have to look out for some though. I think the pouch has been taken off you already....Won't see that again.
oh my the loveliness!!! It gorgeous and I'm glad you're anal, it's perfect!! Clever tip about using tape. I may have to get some of that laminate now ;)
Miss E is so adorable!
The pouch looks fantastic - I love that you made the pattern line up. And Miss E is adorable!
Fabulous!!! Awesome job for your first time with both laminate and a zippered pouch. You are very clever to make it all line up as you did...
Awesome job -- you rock! Love how it lines up, too! LOL
Thanks for all the tips....now to get some laminate!
It's fabulous! (And Miss E is soooo cute!!) I've just got some Summersville laminate (I won it!!) and might make myself a pouch now I've seen yours! Or I might admire it for a while longer!!
It looks great! I think I'll try that top stitching on my next pouch..=D
Post a Comment