Friday, July 29, 2011

Spinning Stars Quilt [Cutting]

I will be away from sewing and the computer for the next week or so as we move to our new home.  Today was spent packing up our belongings used over the last month while living at my in-laws.  There will be a lot to update you on when I return and am plugged in again (we have been having the DSL vs. Cable Internet discussion).  Before I packed my computer I wanted to post about starting Spinning Stars - yes I have been working on it! 

I ordered two 1/2 yard bundles of the Loulouthi line in the Eleni and Isabella colorways from The Intrepid Thread.  I was so thrilled when the package arrived that I did a few mental jumping jacks and eagerly ripped open the box.  In other words, I failed to do a proper show & tell of the beautiful packaging job executed by The Intrepid Thread!  Forgive me, instead I will describe the elegant white tissue paper wrapped around my bundles with purple ribbon and the thoughtful touch of the matching purple business card attached.  Oh, and I cannot fail to mention the fabric samples that were also included in the box!  Miss E immediately jumped on them and was simply enchanted with the Alphabet Soup sample we received.  Thank you Intrepid Thread - I hope both my girls will come to love fabric as much as I do!

Loulouthi 1/2 Yard Bundle
Loulouthi

Every once in awhile you come across fabric that is so...well the only word I can use with all honesty is delicious.  Yes, delicious.  I felt this way about Amy Butler's Midwest Modern, Anna Maria Horner's Good Folks and I feel this way about Anna Maria Horner's Loulouthi.  I enjoy it so much that it hurts.  I just want to immerse myself in this fabric!  Whew - okay had to get that fabric lust out.

I laid out the two colorways and switched a few things around to better suit my Free Spirit Designer Pink and Orange solids.  The first photo below shows the original colorways with the solids...and the second photo depicts my slight changes.
Spinning Stars Quilt Fabric
Original Colorways
Loulouthi Colorways Original
My Colorway: switched two of the fabrics with each other.
Then I finally started cutting.  I decided to start on one quilt at a time as it is likely that I'll be able to learn something from the first to ease my creation of the second.  I hope!  So I chose to do Pink first.  I printed out the pattern instructions and template and got started.  
IMG_4563
Template from Anna Maria Horner's Website

IMG_4567
Transferring Templates onto Cardstock or Cardboard is extremely helpful
For the center star pieces I decided to cut them alongside each other essentially emulating the star pattern.  (see photo below)  Because I had my fabric folded over I was able to limit my cuts to 4 cuts per 1/2 yard and I have plenty left over to do use for else.  As this is for a the new design for the Squishes' Room I plan on using the extra fabric for details such as pillows, curtains and other accessories.  Because I am using solid fabrics to surround the spinning stars I didn't need 1/2 yard of each patterned fabric and probably would have been safe with a Fat Quarter for these center pieces.
IMG_4565
Piece A for Centers of Spinning Stars

IMG_4569
Cut pieces in the star pattern.  Fabric is folded over.
Then I had to do some math to figure out the other piecing.  I realized that the original instructions ask for 72 pieces (36 right side, 36 wrong side) of Piece C...which is perfectly doable...when you cut Piece C from every 1/2 yard of 10 different fabrics.  In my design I am only using two fabrics for Piece C (the Hugs & Kisses fabrics).  And...I only had 1/2 yard of each of those two fabrics.  Agh...this basically meant I had to be creative with my cutting!  I barely have scraps left of the fabrics I chose for Piece C.  So if you are doing this method buy a yard for the Piece C fabrics so that you aren't taking as much of a risk!
IMG_4592
My math on side of instructions.
IMG_4591
Cutting Piece C.  Figuring out how to cut 36 Pieces from 1/2 Yard.

IMG_4593
This is all I had left to show of this fabric!
Of course after the Piece C fiasco...which by the way was the worst shape to cut...I realized I wasn't going to have enough Solid Pink for Piece B.  Luckily I ordered more Free Spirit Designer Pink Solid from Pink Chalk Fabrics.  It just arrived here yesterday - just in time for me to pack it up!  I'm off to move to far far away.  Until I am back at the computer take care...

- rebecca lynne

Wednesday, July 27, 2011

Works in Progress Wednesday

Work in Progress Wednesday - July 27th 2011

"I'm taking the time for a number of things that weren't important yesterday...and I still go..." Fixing a Hole by The Beatles

A few of the quilting blogs I follow, and a number of the Tumblr blogs I occasionally peruse, post a "Work in Progress" on Wednesday.  I previously rejected this idea for my Lush Cluster Blog as it made me feel pressured to write something up about what I was or wasn't working on...you know...guilt.  But, I've changed my perspective on that and have decided it might be a good thing to take stock each week on how things are going and to really lay it out on the table exactly what I have gotten myself into.  I tend to forget how many things I start and it isn't until too late that I realize, crap, what was I thinking starting all these things?  I'm going to take the B.W.O. stance on it and see how it goes.  [Feel free to visit my little B.W.O. bird on the top right over there to see what blogging without obligation is all about!]

Projects Accomplished:
  • New Banner (see above!)
  • New Haircut - not sure if it is too short...but it grows back.  (see photo below)
  • Lush Cluster Diamond Necklace for Shirley Project completed this week!  
    • Whew hew.  I even took some pictures and will do a little mini post on that soon.  Here is a sneak peak...
Lush Cluster Diamond Necklace
Projects In Progress:
  • Spinning Stars Pink Quilt
    • All center star pieces are cut
    • 1/2 of the corner pieces are cut
    • Ran out of pink fabric for star borders, ordered more, am awaiting post!
Spinning Stars Center Pieces out of Loulouthi by AMH
  • Funky Aboriginal Windows Quilt
    • Can't actually take credit for this one...but Shirley started sewing, 7 out of 16 squares have been sewn - Go Shirley!
  • Lush Cluster Bridal Order #1
    • 1 Pair of Earrings completed...9 more to go
  • Lush Cluster Bridal Order #2
    • Worked diligently on one piece, plan to finish this week and send photos to bride for approval


Projects Sadly Untouched:
  • Spinning Stars Orange Quilt (decided to work on Pink one first and go from there)
  • Squishes Room (on hold as we are moving next week)
  • Lush Cluster Vina Necklace Order (confirmed order but haven't started)
  • Mani/Pedi which I hope to accomplish tomorrow...fingers crossed...

WIP TALLY:
3 Completed (if you can count my haircut...and I do)
4 Works in Progress
4 Awaiting the Love (Not counting the thousand or so back-burner projects I have in my brain)

Given the fact that I was sick, oh and Miss E succumbed to illness shortly thereafter, overall I can't be too disappointed in myself.  Just wait until I go back to work...then those figures will really be scary!  

Have any WIPs of your own?

- rebecca lynne

Friday, July 22, 2011

Study in Color - A Musing Post

I need a journal.  A big one.  With lots of white paper, and maybe some graph paper too...so that I can draw up all of the ideas in my head.  Especially today.  I.  Am.  Sick.  Yup, my darling Miss V's virus caught up to me and I woke up this morning...well...I'll leave it to your imagination.  Suffice it to say that I will be in bed with ginger ale and bread for the day.  Back to the journal, while I lay in bed I have a million ideas in my brain all bumping up against each other and no way to get them accomplished.  Instead I thought I would write this little post - which had to do with drawing and drafting in color - before saying adios for the weekend.


Miss E drawing her interpretation of Tinkerbell
Before having children I did not really work in color.  In fact, when assignments required color it was such a chore.  I simply never had a desire to use color in my work.  Well...let me clarify...I used monochromatic schemes but never combined multiple colors together.  My work in college, both in Fibers and Ceramics, consisted of neutrals, black & white, and monochromatic groupings of pots and fabric.  I was way more interested in the process and the relationship between shape and form without giving much thought to the color at all.  Now that I think about it, even Miss E's baby quilt was a complex pieced pattern with pretty simplistic color choices.  It is amazing how much your children shift your view of the world.  All of a sudden my life is full of color and I am drawn to it.  From the loud primary colors to the hush of pastels...I have started to crave quilts of all color variations!  This is probably why I am so attracted to Anna Maria Horner, Amy Butler, Heather Ross, and Denyse Schmidt right now...I just want to have the color choices for their fabric all over our home for my girls.  Of course, you know what will happen, this will inevitably lead to my daughters' attraction to black clothing and neutral/minimalist making of art just as I had.  Ha!

I am going to try to get my ideas out 2 Dimensionally...and brace yourself...in color.  As I tend to work much better in 3 Dimensions there is going to be a lot of trial and error.  I was considering a very modern all solid fabric quilt and decided to draft out my version as seen in my over active brain.  So...I tried drawing it.  Sigh.  You can see what I mean in Example A: Color Study...

Before you scrunch your face let me defend myself - This is NOT what this image looks like in my head.  I swear!  I just can't draw out what I see in my brain...which is so damn frustrating.  Ladies & Gents, this is a sad state of affairs but I am doing my best not to be discouraged.  In my head there is depth to this image, the little bits of yellow are like sparks that seem to glow, the magenta seems to move towards you as the purple recedes.  Why can't I put that on paper?  Who knows...different people have different gifts I suppose.  I'll keep working on it.  Maybe Miss E can give me drawing lessons!  By the time I get the 2D version of this idea down correctly maybe I will have time to actually work on a quilt like this.  In the meantime the projects and ideas are piling up!

Feeling dizzy...but better for having accomplished something!  If my mother is reading this...yes, I am going to go rest now I promise!  Have a great weekend.

- rebecca lynne

Wednesday, July 20, 2011

Working it out

I have a lot on my plate right now.  Trying to get contacts established in my future home - that is my roundabout way of saying "networking for job hunting purposes."  Applying for jobs no one will hire me for because I am over educated/qualified.  Really not the most glamourous position to be in as I am sure you can imagine.  And, to top it off, Miss V caught a stomach bug when we took her for her last checkup and is really miserable thus making us all miserable for her.  So far Miss E hasn't caught it from her sister - thank god!

Anyway, as usual when inundated my creative juices go crazy, probably because I would rather avoid reality.  I didn't want to leave you out of my banner process so I'll just quickly post some things here.  Here are my starting steps using Memory Mixer to revamp the banner.  Not sure what elements will stay, what will leave, or what will find themselves added...it is hard to vocalize this process so instead I'll just show you some images of my progress thus far.  I didn't draw a sketch for this one (probably a bad move on my part) I just started playing around on the computer right off the bat.  Thoughts anyone?

This was the first start.  I chose a background for the blog and the banner.  Not sure if the B/W Shoulder Blade shot is going to make it in the final edition.  Upsetting because it has been my tag photo for a long time in various things and sentimentally disappointing because my Bro took that shot of me while hanging out in a bar eons ago.  Someone recently told me that as a 30-something mother I had no business using a shot of myself like that in anything - pssht - what?  I haven't given up on myself yet...
This is the latest version.  No, I am not sure what is going on with that flying pig...but isn't he damn cute?  Can't decide whether top is too busy yet, but at this size on my screen I am liking the busy.  Still need the rebecca lynne and a photo. I also don't know how to add in a shot of my quilts although something came to me last night in a dream...if I can just work that it maybe that'll be the clincher.
In other news, I began cutting fabric for one Spinning Stars Quilt.  Ha, I need more fabric!  I am one shape short in the solid pink fabric I bought.  Agh!  I am going to have to hunt and make sure I buy the exact kind of fabric again.  Wish me luck.

I'll have a post on Spinning Stars soon.  Love working with Anna Maria Horner's Loulouthi line...can't wait to show you pics as it is so cheerful and summery!

- rebecca lynne

Tuesday, July 19, 2011

Revisiting the Banner

Ugh...I knew it would happen eventually.  This is why internet browsing gets me in trouble!  There is just too much inspiration out there.  Geez Louise.

I really love my current banner.  It was fun to make and it was one of those rare times that I saw something in my head and actually successfully reproduced it.  It is a digi scrapbook using some of my pieces of work (quilts, jewelry, baking) with flowers, shabby chic elements, and cute text.  At first I was happy with it being a flat rectangular banner, but when I keep coming back to the blog I wish it blended in with it more.  But how to do that without giving up the aesthetic of the white?  And besides, even if it had a "background" color it would still be a rectangular banner on the page.  I decided to ignore it for a bit and see come back to it at some later point.


That was when I stumbled upon www.sparktheevent.com.  Ladies and Gents this banner rocks!  It resolves the problem of the Rectangle On Page issue that I have and well it is so damn cute.  I am a sucker for birds/sparrows in that shabby chic style...I might just have to bring that element into my own banner design especially as it brings some height into it as the bird flies towards the banner.  Love it!

{source}

Obviously I want to make my banner unique to me - so I do not intend to copy Spark simply use the composition as inspiration...  Although upon closer inspection our banners share some of the same elements such as the paper flags, butterflies, and flowers.  This might take awhile for me to revamp my banner as my design really focused on a left to right orientation so I'll have to work with making it a vertical layout.  I'll keep you posted!

- rebecca lynne  

Saturday, July 16, 2011

Funky Aboriginal Windows [3 Layout and Why I NEED a Design Board]

In my last post I regaled you with the adventures of choosing fabric and cutting it for the FAW Quilt.  I also promised to preview the last fabric we purchased in an effort to even out the black fabric we were determined to use.   Well...drum roll...here it is:

Fabricandart.com
And yes, it is really black and those bright star shapes add a lot of white interest as well.  I think it helps brighten up the quilt and am really happy we went with this choice.  The official name is Wild Fruit Black.

Now that we had all of our fabric choices it was time to layout our pattern.  I cannot emphasize how painstaking this was - granted most people are not as anal when it comes to fabric layout as Shirley and me!  How can I possibly demonstrate what I mean?  Well, how about some diagrams I made illustrating our different layout versions.  [I know, dork.]


Let me begin by saying that the follow pathetic excuse for photography is Exhibit A in defense of my Why I NEED a Design Wall crusade (directed at husband/mother who know my birthday is impending).  These layouts were on the floor of Shirley's oriental carpet (which I magicked away using the computer) and required us to crawl around on the floor to pick them up, move them around etc.  We had a lot of help from Ms. V who wanted to eat the fabric, Ms. E who wanted to help us arrange them, and Miyu who wanted to roll around and generally rub herself on the squares.  Furthermore, I am 5'2".  This layout is (hmm doing some basic math via calculator) 56" x 56".  Put us together with a camera and you receive photos taken while I stand on tippy toes in an attempt to get the whole layout in the shot.  Voila - craptastic photography.  Don't Judge!

Version 1                                                            This had two glaring Hot Pink Blocks in it that were driving us crazy. We couldn't handle it because the pink stood out enough already amidst the various browns, blues, and yellows.  So Bleh, couldn't have that.


Version 2                                                          There was this whole row of flip flopping pink and black borders and centers.  No thanks. 


Version 3            
I liked Version 3 a lot...but there were two centers, both on black frames that kept coming up diagonal to each other.  So, that didn't work either.
 
I'm not sure how we ended up at the final layout.  This is a short post but the layout took All Day to figure out. Going back and forth, leaving the room, revisiting it...ugh...  At one point my friend Lauren of SoireeBKNY was on the phone with me as I struggled with the layout.  She asked Are you doing something? / Yes I'm trying to fix this Aboriginal Quilt / She answered Yeah, I can tell by the way you sound.  Ha, so obviously I was bit distracted not to mention frustrated!  However we got there eventually and ended up with this:

Final Funky Aboriginal Windows Quilt Layout

I'm really happy with the balance of all the squares with this layout.  The border, a little bit of which you can see at the top there, is a light gold which I think will really lighten the quilt up and bring out all the yellows and emphasizing the blues in the fabrics.

It needs to be sewn...but for right now I need a break from this color palette.  The aboriginal fabric is unique & beautiful, one of my favorite combinations.  But, it is hot, it is summer, and I am in the mood for something bright and funky!  As predicted, my mother is already asking what is going on with Spinning Stars and I am probably going to start working on that soon.  As for today?  A wheat beer on the patio is in order.  Have a great weekend!

- rebecca lynne

Friday, July 15, 2011

Funky Aboriginal Windows [2 - Cutting the Top Fabric]


Alright...last time I wrote about the Funky Aboriginal Window Quilt ("FAW") I explained that Shirley and I had decided on the size for our squares.  To briefly recap we decided on sixteen 14" squares, each with a 2" Frame, and a 10"x10" Center, and a 3" border around all sixteen squares.  Feel free to visit Part 1 with my digital diagram here.

Before I go any further - yes - I know that there are some of you (mmm...like probably my mother) who are wondering "whatever happened to that 
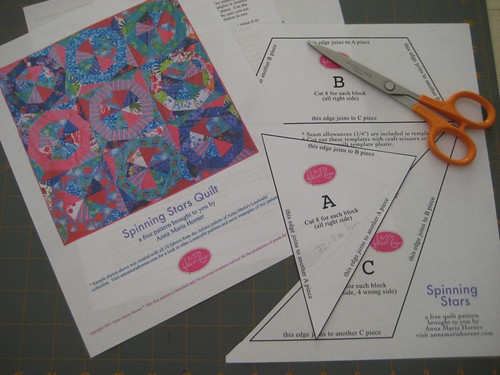
Spinning Stars Quilt and the Squishes' Bedroom?"  Never fear, I have not forgotten.  But, let's be honest, I am a project whore.  Yup, I cheat on my projects.  Shrug, there I said it!  It just keeps me motivated to keep going if I have ten things going at the same time.  I have always been ashamed of this until I read about another quilter and her own struggles with "project monogamy." I was immediately relieved to know I am not the only one!  Thank you Marianne from The Quilting Edge!  So yes, I do have updates on those projects as well as a few others I have started but this is the one I am writing about now...I promise to report back on the others later.  

Focusing on the task at hand...Cutting top fabric for FAW.  I am going to break it down into what you Need to complete this pattern and what I Did.


Top Fabric: At Least 8 but No More than 13 Aboriginal Fabrics

I say at least 8 because that is enough to make 16 Squares and move things around and provide variety so long as you don't mind that every fabric will be used as both a Center Square and a Frame Twice.   Why no more than 13?  Well, as I hope you will see from my photos below, this fabric does amazing things when paired with its various friends.  It is an exercise in complementary colors and reminds me of an optical illusion as Fabric A with Fabric B looks X, meanwhile Fabric A with Fabric C looks Y.  Therefore, it is a positive to have duplicates to create this dichotomy.  What is even greater is that the same fabric can be in your layout multiple times but it is not obvious as it adapts itself different depending on its frame.  

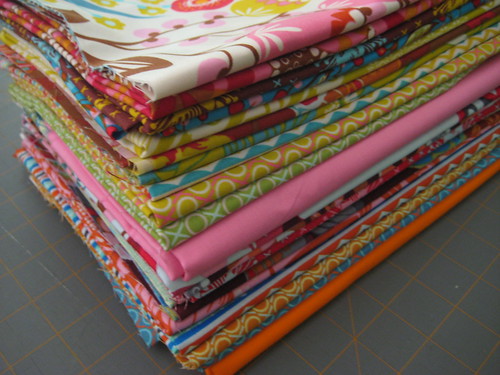
Shirley and I started with 12 different top fabrics (excluding the total border which would create 13).  This is what gives us the freedom to be picky about the composition of our Centers as well as the overall quilt layout because we have extra fabrics to move around and pair with each other.  Some fabrics we chose only to use as Frames while others we opted to use as Center Squares twice.  One thing to keep in mind is that this fabric is heavily patterned and having MORE allows you to be picky about what part of the pattern of each fabric you'd like to use as a Center.  The patterns change so quickly within one Fat Quarter or 1/2 Yard that there are multiple options as to where to orient your Center.  Having additional fabric allows you to choose without worrying about whether you will have enough left over for Frames.

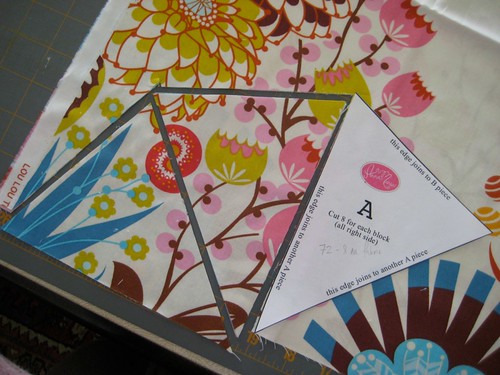
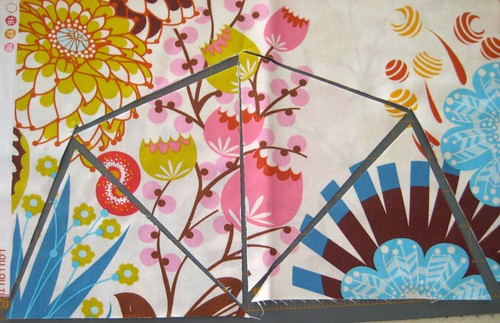
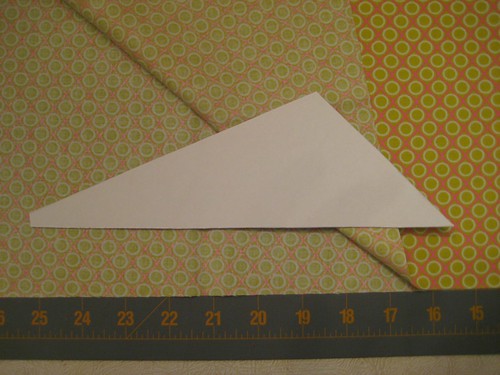
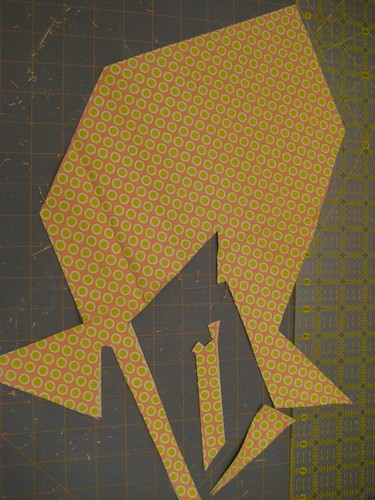
If you are careful about your cutting, and are not particular about where the orientation of your Center Square is, then you can happily cut 2 Centers and 1 Frame from only a Fat Quarter of fabric.  See Diagram Below.   [NOTE: This method only renders 1 Frame per FQ.   Keep that in mind when preparing your math and mental layouts in head.  You will need more than FQs cut in this method to achieve enough Frames and Centers, but cutting in this method will allow you to utilize almost all the FQ and create more than one Center per FQ if that is necessary in your particular design.]  


Tangent (i.e. feel free to skip over)
For you experienced quilters and fabric devotees out there - yes - cutting this way is cutting selvage to selvage.  There is an ongoing debate amongst quilters as to whether to cut perpendicular/parallel to selvage.  As someone who had "no cutting against the grain" beat into her from an early point in her textile career I still cringe a bit when I do this.  But, the experienced quilter in me knows when it is okay and when it is not.  Cutting selvage to selvage (as opposed to along the selvage) may create strips of fabric that are stretchy depending on your fabric.  They appear innocent enough cut, but regret comes later when you begin to sew.  It has to do with the way fabric is woven, cutting with the selvage is cutting along the warp as opposed to the weft - blah blahdety blah - you have to be a weaver to care.  Anyway, my point: in certain patterns I would tsk tsk this method, but this aboriginal fabric is sturdy cotton and the stretch is minimal so don't worry about it.  Rules are created to be broken after all.

Online Aboriginal Fabric Resources


What To Cut
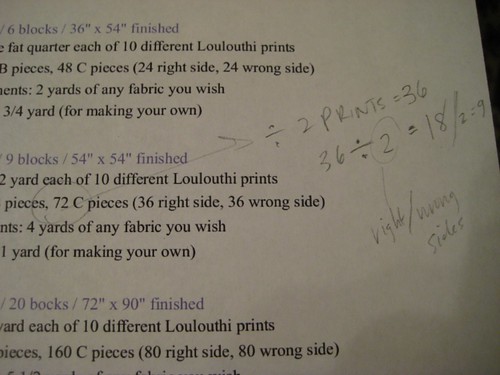
Total Yardage --> 3 yards
This can be made up in a number of ways [12 FQs or 9FQs and 3 Half Yards or 8 FQs and 2 Half Yards, and so on...] depending on what number of fabrics you choose for your pattern.  


16 Center Squares --> 10" x 10" Center Squares (duplicates encouraged)


16 Sets of Frames --> (2) 2.5" x 10.5" strips, (2) 2.5" x 14.5" strips each fabric (duplicates encouraged)

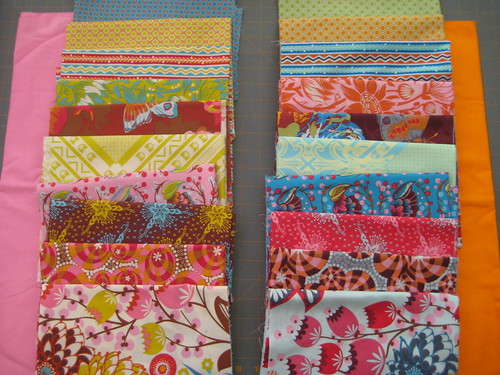
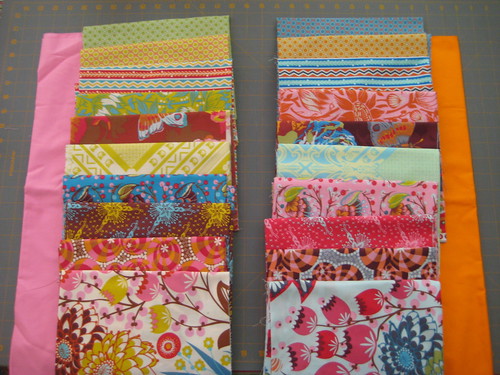
For Reference these are our fabric choices and how I cut it:


Whew, once you have all of your 16 Centers and 16 Frames cut it is time to lay those babies out and arrange things how you want your quilt top to look.  Let me tell you, this can be tough!  The fabric is so diverse and there are so many awesome (as in "extremely impressive or daunting" and not "yeah dude, cool) combinations.  Be prepared to stand in awe as your layout develops...this fabric is so mesmerizing!

I am going to reserve our final layout for the Top Fabric in my next post.  I intended to do it all together...but this post is longer than I expected.   No, I do not regret making my geeky diagrams, ahem!  My delay has more to do with the fact that after playing with our layout Shirley and I saw one glaring issue in our fabric choices...  Do you see it?  


Even a quick layout on the dining room table reveals that your eye is drawn to the BLACK FRAMES!

Those black frames stand out so much that we regrouped and ordered another fabric to see if we could balance things out a little more.  I'll introduce you to our new fabric and our layout in Part 3...

- rebecca lynne

Monday, July 11, 2011

While I cut fabric...

I am in the midst of cutting fabric.  With two quilt projects in the works this could be awhile...

I thought I'd quickly post and point out my new Banner.  I made it last night using Memory Mixer.  I originally bought Memory Mixer to create a one of a kind book for my daughters using digital scrapbooking.  I want their book to be perfect so it is taking some serious planning and time.  Any digital scrappers out there?  It is a fascinating design process...so cool for anyone who loves 2D Art and computers.  Yet another project on my list to blog about.  I intend to post some of my digital scrapbook pages in the future and show you how the book is progressing.


What do you think of the banner so far?  As I'm sure I'll change it (knowing me sooner than later) I have included a copy of it in this post.  I know it doesn't have fabric in it...yet...but this is a start.  Much better than the plain boring title!

- rebecca lynne

UPDATE: While writing "I'm sure I'll change it" two sentences above it occurred to me that if I was already writing that then yeah, the banner wasn't going to cut it.  Ugh.  Don't you hate when you realize that?  You make something, convince yourself it works, and then realize literally 20 seconds later...mmm not so much.  So yes, I spent my post-dinner evening creating a new banner from scratch.  And voila, Making Rebecca Lynne was born.  I love it!  What do you think?  To learn more about the title see my About page.  


I've added it below for posterity.  I'm already thinking about making a holiday themed banner...ooh like for Halloween or maybe my birthday...agh, I must stop myself the potential is endless!


 - rebecca lynne


Sunday, July 10, 2011

Funky Aboriginal Windows

Carlene Westberg's Funky Windows Quilt

Ever since I saw this Funky Windows Quilt designed by Carlene Westberg I have been trying to find the right fabric to make it!  I bought the pattern from Carly almost a year ago and still it sits lonely in my pile of Quilts to Create gathering dust.

Then it hit me...a few months ago my friend, and mother-in-law, Shirley introduced me to aboriginal fabric produced by M&S Textiles.  We fell in love with the crazy colors and unique patterns that we immediately began collecting various fat quarters and half yards to create a quilt.  At first I suggested we create a Brick Path Quilt a la Amy Butler's Lotus Brick Path Quilt.  The Brick Path quilt design is great for modern large patterned fabric and is very simple to create using strips of large rectangles.  It is one of my favorite patterns and I've had great success using it with Anna Maria Horner's Good Folks Collection (adore this collection - it is hard to find today but I've had luck finding it on www.Etsy.com)

Amy Butler's Brick Path Quilt Design in Lotus

When I recently saw the aboriginal fabric again in person I noticed that the fabrics are so varied with slight overlaps in common coloring and small circle designs that I immediately thought of the Funky Windows Quilt.  What better way to literally frame the unique aboriginal designs while celebrating their contrast with each other?  After bouncing the idea off Shirley I decided to hop on the computer to try to make a draft image of what the squares could look like using our fabric collection...


After playing around with this image we laid out the fabric and tried it in person on Shirley's dining room table.  I wasn't able to snap a photo (my camera was being held hostage in my daughter's room...while she slept) so you'll just have to take my word for it that it looked amazing!

Now came the quilting math that each quilter either Loves or Hates.  Personally, I am a hater of Quilt Math but a lover of coming up with my own spontaneous patterns.  As a result I am notorious for compensating by buying too much fabric in my efforts to sidestep worrying about whether I will end up with enough.  Inevitably this leads to a grumbling husband about extra bits of this and that fabric everywhere...but it leaves me with a mean patchwork quilt or diaper clutch every so often!  (In other words, worth the grumbling.)  Anyway, I digress, in this instance we had already purchased the fabric and had to modify the original Funky Windows pattern (which calls for 32 Fat Quarters) to our own fabric stash.

My Math Sheet to Figure Out Squares
We ultimately decided on a pattern of sixteen 14" squares.  Although the original Funky Windows pattern calls for rectangles of varying sizes we are going to create all the same shaped square.  Given that the aboriginal fabric is so varied we believe the quilt will be busy enough using one consistent shape.  Each square will have a 10"x10" center and a 2" border.   To set off and frame the overall quilt we are also including a 3" border around the entire sixteen squares to create a 62" quilt.  Stay tuned to get the complete pattern and photos of the design layout in a future post!

- rebecca lynne

Saturday, July 9, 2011

The Squishes Room

We are moving into a new home and are planning on having the Squishes share a room.  Of course, there is a huge chance of this being largely problematic, but I am determined that eventually they will happily share.  Sure I'll just snap my fingers and voila right?  Hardly.

The issue of sharing aside, I have made a promise to myself that I will have a cohesive design for their room.  In our last home the baby's room started out well...not too babyish (I'm not well known for my love of pastels) but still fun with an orange and brown bird theme.  I used Joel Dewberry's Aviary line in Bark for the crib bumper, skirt, and sheets to create the color theme.


Some of the room's design elements included a silhouette bird mobile by Spin Designs, a bright hand-painted bird drawing my husband and I found in Mexico, a black and white ink drawing by my best friend featuring a Peacock riding an Elephant, and a bird house nightlight (courtesy of my very creative and crafty in-laws).  I also hung gold birdcage decals with bird silhouettes over my daughter's crib to tie it all together.  


Unfortunately, as the largest bedroom in the apartment it soon became the catch all for miscellaneous things we had nowhere else to store.  I am committed to making sure that doesn't happen again.  Instead, I am starting with a plan and a few key projects to help avoid such a calamity.

As a starting off point I found this great example of a girl's room I liked from Photographer Ashley Ann.  Ideally I'd like to use some of her ideas and combine them with my own design elements from our first baby room.


Colors
The first baby room started off with orange and brown.  Then, as my toddler grew more vocal, more elements of pink were added.  Therefore, I am going to continue the pink, orange, and brown theme in our new home.  I intend to keep the colors bright and fun by using textiles as accents such as Anna Maria Horner's Loulouthi line.

Photographs
I always have our home littered with photos (my dad psychoanalyzes this but I largely ignore his conclusions).  I really love the mini gallery-esque way that Ashley used framed photos in the room and I am going to try to emulate that.  I already have a lot of the vintage baroque type of frames that I've used in my living room and I can just repurpose them in the girls' room instead.

Ceiling Pompoms
Of course anyone who enjoys Ashley's design can plainly see that the ceiling pompoms are a must!  I found a few DIY links on how to make these fluffy accessories and will be adding that to my list of To Dos for this room.  I'd also like to use some paper garland seen here but haven't decided how to tackle that yet.


Textiles
I've already began gathering the fabric to make the girls coordinating quilts to have over their cribs and later their beds.  The Spinning Stars Quilts in the Loulouthi fabric line will hopefully be underway as soon as I receive the fabric.  I'd also like to make a cushion for the antique wooden rocking chair that we customarily keep in their room, curtains, a few throw pillows, and a cover for the changing table.  In addition to the Loulouthi line I also have some Amy Butler Midwest Modern and Anna Maria Horner Innocent Crush fabric that I can incorporate as well.  All modern, bright, but feminine fabrics.

Because the Loulouthi line is so bright and varied in color, I think the fabrics will blend well with Joel Dewberry's Aviary line.  Luckily the fabrics I chose from the Aviary line were mostly the abstract oranges so it should blend in nicely with both Anna Maria Horner and Amy Butler collections.

- rebecca lynne

Thursday, July 7, 2011

Spinning Stars

My first project is going to be two Spinning Stars quilted throws using Anna Maria Horner's newest line Loulouthi. The quilts are going to be made for each of my daughters to celebrate their new room. This is one of a few projects that I hope to complete for their room. Hopefully, with your help, I'll be able to complete them all!

Spinning Stars with Solids

Anna Maria Horner's Spinning Stars design with Solid Fabric
Quilt pictured here created by Anna Maria Horner.
[Photo from Anna Maria Horner's blog annamariahorner@blogspot.com]
Quilt pictured above created by Anna Maria Horner.
[Photo from Anna Maria Horner's blog annamariahorner@blogspot.com]
I have chosen the Isabela Palette and the Eleni Palette of Loulouthi to make my two throws.
Eleni
Instead of the Aqua Solid Fabric used by Anna Maria Horner in her design (see above) I am going to use Pink and Orange as my solid colors. The girls room is going to be primarily Pink, Orange, and Brown so I am hoping this will tie these multi-colored quilts into the theme.

I ordered the fabric I need to make the quilt tops last night...so as soon as I start cutting and getting them sewn I will do my best to post photos as the project get started.

Any thoughts on what I should do for the backing? I like the idea of using Voile in the Loulouthi line...but perhaps I should do a solid fabric instead of a patterned fabric.

- rebecca lynne