As promised, here is the free pattern for my Mega Sewing Pouch Pattern! To see more pictures of what this pattern creates pop over here to read this post which features more detailed photos of the bag. If you decide to make one please let me know - I'd love to add it to the MRL Flickr Group!
{If the instructions I've included below are vague, confusing, or just annoying in some way do leave a comment and I'll happily edit wherever possible.}
- rebecca lynne
Materials
- Fabric
- 1) Front Exterior Fabric - a fat quarter should be just enough
- To have a different *bottom* to frame the outside as in my example you will need 2 exterior fabrics
- Get creative by patchworking, piecing, adding linen fussy cuts to make it interesting
- 2) Front Quilting Interior
- I used whatever I had lying around, it won't get seen because of the bag's lining
- 3) Bag Lining - a fat quarter should just be enough
- Batting (I prefer Warm & Natural; I also used bits I had lying around and pieced them together)
- 12" zipper
Step 1: Cut your fabric
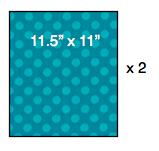
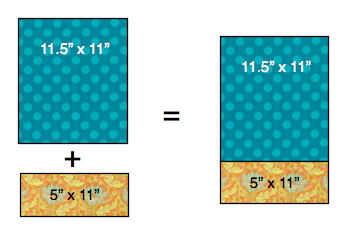
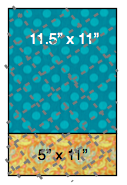
2 pieces of 11.5" by 11"
2 pieces of 5" by 11"

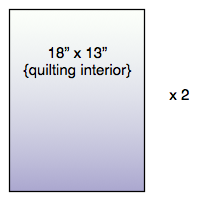
2 pieces of 18" by 13"
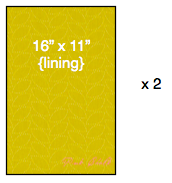
2 pieces of 16" by 11"

2 pieces of 18" by 13"

2 pieces of 16" by 11"

Step 2: Prepare your Bag Exterior
- Sew together the top of the bag exterior with the bottom to create a piece 16" x 11"
Step 3: Quilt your Bag Exterior
- Sandwich the batting between your Bag Exterior and your Quilting Interior
- Make sure your Bag Exterior's fabric is facing right side up!
- Just like when you make a quilt sandwich for a regular quilt your batting and Quilting Interior fabric should be larger than your Bag Exterior Fabric so that you can trim after quilting
- Pin
- Quilt! I used a basic straight stitch design that would help give some structure to the bag. The closer you quilt the firmer your fabric sandwich
- After quilting trim to 16" by 11"
Step 4: Zipper Pouch Basics. Um, Google it... ;)
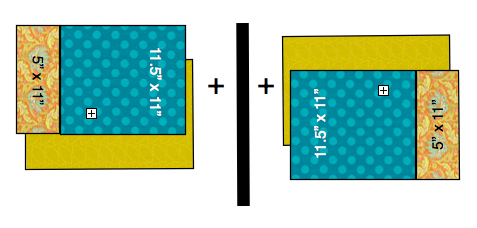
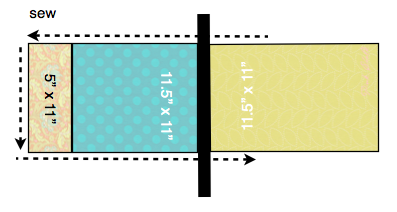
- Sew your Bag Exterior (which should be quilted after Step 3!) and your Lining to the pouch zipper.
- Rather than reinvent the wheel you can learn about sewing an easy zipper pouch here, here, here and probably a million other places!
- The 12" zipper will be longer than your sides, I prefer my zipper to completely cover the bag width so that it definitely opens completely w-i-d-e. This will mean that your zipper will be too long and after you sew you can trim the end. Or using Noodleheads tutorial you can choose to sew an open wide zipper bag. Be careful not to hit the zipper with your needle, it will snap! Guess how I learned that lesson...
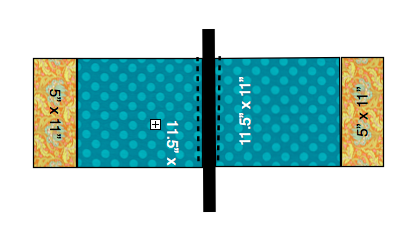
sewn together it will look like...
- I highly recommend top stitching your sides where the zipper attaches because it just looks polished!
- MRL Tips:
- Sew your pouch sides together per the tutorials you've read.
- Remember - right sides of fabric together! And, of course, leave an opening in the lining side so that you can turn the bag inside out.
- Don't forget to leave your zipper open so that you can pull the bag inside out! But don't pull it inside out yet...
Step 5: Give your pouch a "butt" (or more politely, Squaring Off Your Bottom)
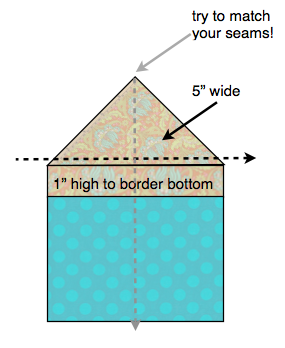
- This pouch has a 5" wide squared off bottom
- I suggest you research squaring off your bottom online, as usual there are some great tutorials out there to give you some ideas
- Your bag is still inside out after being sewn together!
- Starting with the Exterior Bag side
- (a) Pinch your seams together and align the seams as much as possible
- (b) If you are making the border around the bottom of the bag as in my version you will also want to line up where the fabric piecing seams are as much as possible
- (c) Using a ruler, measure so that your pinched together part where you will sew is approximately 5" wide. Pin.
- Repeat steps (a) - (c) on the other end. Pin.
- Compare your two ends. Check your seams. If you like your place draw a line to mark where to sew. If you are anal like me you might want to baste, turn inside out, check it, and then reinforce.
- Once you have perfected your corner then you can trim your corners by cutting off the excess! But seriously, check first or else you will always look at your bag if it is even the little bit off...
- Repeat these steps with the Lining but stress less...if the corners inside aren't perfect who cares? After all...it is inside! ;)
Step 6: Flip and Finish!
- Flip your bag inside out...trim threads, trim zipper if you haven't already, close off your lining...
- Stand back and admire!
Of course now you will want to make accessories too! Hahahahaa....






4 comments:
Hey, awesome tutorial. i totally want to make it. I'm trying to pin it, so I don't forget, but Pintrest is only giving me your header or the sidebar buttons as an image. I don't know if this is a Pintrest issue or what, but I thought I'd letter you know
I love this! I want to make! Will go on my long list of things to make. And maybe get pushed right to the top. ;) Thanks for the tutorial!
That is fantastic! Pinned and on my (long) list of 'to do' items.
Great tute Rebecca - thanks so much. It makes sense to me!
Post a Comment