

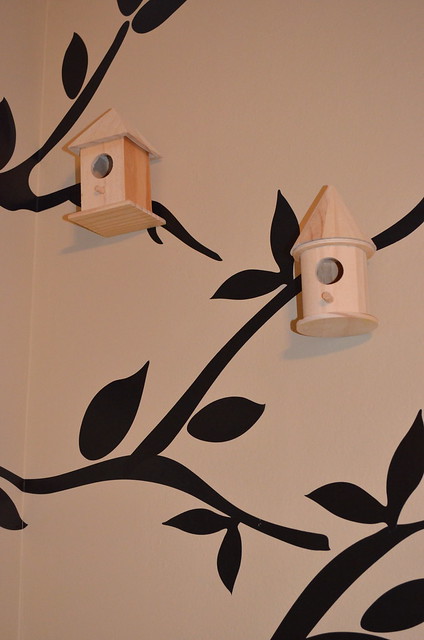
Once upon a time, a long long time ago, okay two months ago, I started this blog with great plans in mind for the Squishes' Room. Finally, after moving and unpacking their belongings, the Squishes' Room is finally on its way to being redesigned. Someday I will do a full post on their room and all its design bits as a whole...but for today I'd like to just share one little corner with you. The Birdhouse Corner.

As I explained in a previous post, a bird theme was featured in their first room in our Brooklyn apartment. I adore the birdhouse night light that Miss E received from her Grandparents and I wanted to keep that up in the new room. Luckily, I came across these affordable ($1 USD) birdhouses from Jo-Ann Fabrics and inspiration struck!
What you will need:
- Small Birdhouses (purchased at Craft Shop such as Jo-Ann Fabrics, Michaels, Walmart)
- Small Sawtooth Picture Hangers
- Hammer
- Pliers
- Tree Wall Decal or Paint to paint tree on wall
- If hand-painting tree on wall I'd also suggest a ruler, multiple sized paint brushes for detail work, and a covering for the floor
- Tape, such as Masking or Duck
- Scissors
- Stool or Ladder depending on height
 |
| An Array of Birdhouses |
Step 1: Prepping your birdhouses
Once you have your birdhouses you will need to prepare them if they do not have hanging apparatus.
 |
NOTE: I chose not to stain or paint my birdhouses as I was matching them to the unstained/unpainted night light already in our possession. Additionally, the girls' room is rather dark with taupe walls so I felt the bare wood lightened up the room in a way that stain or paint would not. Should you want to stain or paint your birdhouses I would do so at this point before adding any hanging fixtures to the back.
I located Small Sawtooth Picture Hangers to attach to the backs of the birdhouses.
 |
| After & Before |
Begin by placing your picture hanger on the back of the birdhouse. Centering it as much as possible.

Then, using your pliers, hold the nail and hammer down one side of the frame hanger.

When you are done it should look something like this. Continue nailing tightly and then do the same to the other side. Do this for each birdhouse.
 f
f
To give credit where it is due...the pliers were The Mr.'s suggestion. This is what my hangers looked like before he handed me the pliers... Exactly.

Step 2: Prepping your Tree
I had originally planned to paint the tree on the wall. But, we are renters and the thought of painstakingly drawing and painting out a tree on the wall only to have to paint over it when we move was too heartbreaking. Instead, I purchased this Tree Decal on Amazon.com. Having used wall decals in our last home I can attest to the fact that they are simple to use and easy to clean up. This is good if you are renting and do not want to paint or if you think that you might want to change your design (or that your child will...) in the future. It is a temporary solution that looks quite impressive when applied correctly.
If you are going to hand paint your tree then go for it! I'd love to see the results so please do share.


I knew I wanted the wooden birdcage I had bought at the antique store to be placed on this wardrobe so I made sure to place it as I went about laying out my branches in order to see how the overall look would be.

At this point I became vertically challenged and had to grab a ladder. Yes, I'm short. Anyway...once that was conquered I simply laid out all of my branches until I had the tree I wanted.
Step 3: Hang Your Birdhouses
After your branches are all up then start taking off the decal back and stick them to the wall one at a time. (sorry, no photos here...got really into it and forgot camera!)
You will want to hang your birdhouses as you'd like on your branches before applying your leaves. That way you can use your leaves as "filler" for the tree after the birdhouses are in place.
Try by hanging your birdhouses on the Ends and Middles of branches for variety.


For all of you decal peeps out there this is what I did. First, I cut out all of my branches and laid them out so that they were easy to see.
Then I started taping them to the wall to experiment with the layout.
Now as you can see I already had a few birdhouses up. I had specific places I wanted the birdhouses to rest so I put those up first. If I didn't have to worry about plugging in the nightlight I probably wouldn't have worried about the birdhouse placement until after my tree was all arranged. It is up to you which way you'd like to lay your wall out.
When you are taping remember to have some overlap between the branches and the trunk.
I knew I wanted the wooden birdcage I had bought at the antique store to be placed on this wardrobe so I made sure to place it as I went about laying out my branches in order to see how the overall look would be.
At this point I became vertically challenged and had to grab a ladder. Yes, I'm short. Anyway...once that was conquered I simply laid out all of my branches until I had the tree I wanted.
Step 3: Hang Your Birdhouses
After your branches are all up then start taking off the decal back and stick them to the wall one at a time. (sorry, no photos here...got really into it and forgot camera!)
You will want to hang your birdhouses as you'd like on your branches before applying your leaves. That way you can use your leaves as "filler" for the tree after the birdhouses are in place.
Try by hanging your birdhouses on the Ends and Middles of branches for variety.
Step 4: Add Your Leaves
Yup. That's it. Add your leaves. Whether you'd like to be anal about it and use tape again...that is up to you. Personally, I just winged it at that point!
VOILA you are done! Birdhouse decor is complete.
Now I would be failing you if I did not explain the mirrored closet doors. From the outset a great debate raged on regarding what to do with the mirrored doors. The Mr. and I agreed that they were a bit outdated (and to some a gaudy eyesore) and therefore should be dealt with swiftly. But, how to deal with them, well, that was an issue. As we went back and forth about removing them completely, covering them with a curtain, or simply keeping them open permanently the cosmetic problem was thwarted by the whims of Miss E. You see, the entertainment value of the mirrored doors far outweighed any aesthetic issues as far as she was concerned. And so, the mirrored doors remain and there was much rejoicing in throughout the kingdom.
I really love this tree and birdhouse idea. Miss E enjoys it as well...although she seems to have less interest in the birdhouses and was much more excited about having "a tree mommy, MY tree" in her room. She keeps pointing at it to show me the "leafs." In the future, when the girls have outgrown the novelty of birdhouses, I'd like to use butterflies or even fabric flowers on the tree instead of birdhouses. For those of you keeping tabs on the development of the Squishes' Room the Pom Pom Ceiling is next!
Do you have any DIY decor in your house? What ideas have you come up with? Please share! I still have lots of other rooms to complete...
Do you have any DIY decor in your house? What ideas have you come up with? Please share! I still have lots of other rooms to complete...
- rebecca lynne
5 comments:
Such a lovely idea - it looks wonderful...would be nice in my bedroom...hmmm ;o)
WOW!!! Rebecca this is so pretty :) There's no way in hell I'm letting my daughter see this she'd be so jealous and I'm totally incompetent at stuff like that. It's such a gorgeous room. Oh and I happen to like those mirrors!! (I'm such a wannabe tap dancer!)
xx
I love the birdhouses and tree decal together! And what a great idea.. a birdhouse nightlight. The entertainment value for Miss E far outweighs any amount of dislike for mirrored closet doors!! I don't think they look bad at all anyway. And just think.. you'll be able to see DOUBLE of that pom pom ceiling if you leave the closet doors in. Would it just be wrong for me to put a pom pom ceiling in every room of my house? LOVE it!! How fun is that.
That is such a fabulous idea! I absolutely love it. We have lots of little DIY things in mine and my sister's house. She has 3 little girls so I have made bunting with their names on and cute little signs for their doors. That's about it though, nothing as gorgeous as your bird houses.
This is adorable! And it's something that could easily be adapted for an older child's (or a whimsical adult's) room.
Post a Comment